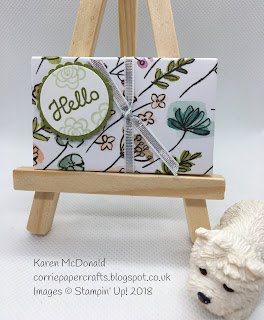
Today's project is a quick and easy envelope punch board box using the gorgeous new Share What You Love Designer Series Paper.
.
.
It's tiny! Just big enough to hold a Green & Black's Velvet chocolate
These are my favourite chocolates as I don't eat dairy products and these don't contain any.
If you'd like to follow my photograph tutorial, follow the steps below to make your own - all measurements are in metric (I'll try to work out the imperial equivalents shortly) .......
Cut a piece of cardstock or Designer Series Paper to 10.5cm x 10.5cm and grab your envelope punch board (EPB)
On one side, punch and score at 5.7cm and then at 6.6cm
For the remaining three sides, line up each score line with the score guide on your EPB, punching and scoring each time
Using your corner rounder on your EPB, round the corners on all points
Now fold and burnish all score lines.
Here's a view of the 'inside' of the box after burnishing
Between each section, you'll see a tiny square where the score lines have crossed
Remove all four of these squares
On the two larger pointed sections, remove the point - removing approximately 1cm or so to leave a straight edge. You can do this by eye or use your trimmer, it doesn't matter as long as you have a straight edge; and they don't have to be exact
With the larger sections top and bottom (therefore the smaller sections left and right), apply a small amount of adhesive to the inside edges of the lover flap.
Taking care to retain the box shape with sides positioned straight, fold in the side sections then bring up the lower section and gently stick down.
It's a bit easier to do this with your chocolate inside
Fold down the top section to complete the envelope shape
View from the front
Hold closed with a ribbon, or make a belly band if you prefer
Decorate with your chosen sentiment. On this box, I stamped the 'Hello' from the new Varied Vases stamp set on to Whisper White cardstock using Old Olive ink and using one of the tiny flowers from the same stamp set I stamped in Soft Sea Foam ink.
i used my 1" circle punch to punch this out and mounted it on to a piece of Old Olive cardstock punched out using the 1-1/8" scalloped circle punch.
I used a Dimensional to add it to my box
And that's it! I hope you have a go at making your own.
I hope you enjoyed seeing this project and how to make it, Be sure to visit again soon!
Karen x
Product List


No comments:
Post a Comment