Thursday, 25 August 2016

Pootlers Design Team - August - Week 4

Well, that's us at week 4 of the Pootlers Design Team for August!
It's been great fun having the opportunity to take part and I've loved it! I've grown to really love the 'Lovely Stitching' stamp set and plan to keep using it regularly now.

My last project for this month is a thank you card:


The thank you sentiment is from the 'Thankful Thoughts' stamp set, but the rest of the surrounding stamping is from the 'Lovely Stitching' stamp set.
I decided to go back to the stippling effect that I used in week 1 to soften the background for the stamping.
I also wanted to make this card using only one colour as well as only one stamp set and I just hoped that it would work! I think it did .....

This is a tent fold card using Whisper White thick cardstock. I've cut it to 4 x 11", scoring and folding at 5-1/2" to make a card base which measures 4 x 5-12".
I then added a layer of Mint Macaron cardstock measuring 3-3/4 x 5-1/4".
Then came the Whisper White layer measuring 3-1/2 x 5" which I stippled with Mint Macaron ink using a sponge.

The stamping, using the stamp sets mentioned above, was also done in Mint Macaron on top of the stippling, which gives an additional effect. I wanted a combination of flowers and leaves and the design really just took shape after I'd decided which stamps I wanted to use.

This was an easy card to make and, despite being easy, I'm really pleased with the end result!

The card is also a big thank you to our lovely Sam (Pootles) for being such a fabulous Stampin' Up! upline and for inviting some of the team to join in with each month's challenge.
It's also a thank you to all of you for visiting my blog and to those of you who have also left comments.

I've loved seeing the gorgeous ideas that my team mates have come up with and am always amazed at how many different ideas can come from 4 or 5 people all with the same stamp set!
I can't wait to see what our September Pootlers come up with and what stamp set they have!

So all that remains for me to say for now is thank you and please visit again soon - I might even challenge myself to choose a stamp set each month from now and come up with a different design each week. So watch this space ......

I hope to see you again soon and, as always, happy crafting!

Karen


Product List

Thursday, 18 August 2016

Pootlers Design Team - August - Week 3

Well, it's now the third week of four and I'm sad to be nearing the end of what's been a huge amount of fun!
It's just amazing to see what my other Pootles team mates have been making with this month's stamp set and, as in previous weeks, you can see them all and visit their blogs (and those of our fellow Pootlers for previous months) via the links on www.pootles.co.uk

This week my project is something I made for myself to keep my place in that gorgeous new Stampin' Up! 2016-2017 annual catalogue whilst planning my shopping lists for my workshops:


Yes, I made myself a bookmark! And without trying, it matches the front cover of the catalogue too!
Well, it's actually one of many, if I'm honest - some for myself and some for my husband and daughters. So we all have new bookmarks in this house at the minute. All custom orders, of course!
You can see the one I made for my hubby to match his new book in another post on my blog and on my Facebook page (https://www.facebook.com/Lilliput-Crafts-289597024498405/https://www.facebook.com/Lilliput-Crafts-289597024498405/)

I'm really loving the new 2016-218 In Colours at the minute, so the base for this bookmark is Flirty Flamingo cardstock with Whisper White cardstock used for the stamping.
I cut the base to 6" x 1-3/4" and the white mat to 5-3/4" x 1-1/4" but you can really make it to any size you like, depending on the size of your book or catalogue.

As you know by now, this month's stamp set is the gorgeous 'Lovely Stitching' which, in my opinion, seems to be a bit overlooked in the catalogue. I certainly didn't take much notice of it until I became part of this design team and was challenged to use it for a month.
I love it and feel quite guilty for not noticing it so much before.

I stamped the bigger flowers in Flirty Flamingo to match the cardstock base, then I added the smaller floral posies using Peekaboo Peach as a bit of a contrast.
I then used Mint Macaron ink to stamp the leaves:


Again, I rounded the corners because I'm not a fan of lots of harsh lines and sharp corners on things.

I punched a hole in the top of the bookmark to add my ribbon which is the stitched satin ribbon in Melon Mambo which is sadly recently retired (apologies); but this ribbon is still available in Real Red and there are lots of other gorgeous ribbons and trims available too, so still lots to choose from.
There's a different stitched ribbon available in Melon Mambo for anyone looking specifically for that colour. I'll add a link in the product list below to this ribbon.

So that's my project for week 3.
I hope you'll pop back to visit next week for our last challenge before we hand over to next month's team; but I do hope you keep visiting Pootles to find the links to our team mates' blogs to see what stamp set is up next and what they create with it!
And, of course, I hope you keep dropping in to visit me here too!

Happy stamping and 'bye for now.
Karen


Product List

Thursday, 11 August 2016

Pootlers Design Team - August - Week 2

Gosh! Week 2 of the Pootlers Design Team already!
It's amazing being a part of this and I'm having fun being challenged to come up with several projects using only one stamp set - I'm trying to use ONLY stamps from this set in each project rather than use them in combinations with others. I'm also trying to make sure I've used EVERY stamp in the set at least once by the end of the month!

It's another card this week:


This time it's a 6 x 4" card with a 'sticky oot bit', as we say in Scotland - very technical term!
The front of the card measures 6 x 4" and the back with the 'sticky oot bit' measures just half an inch wider.
That meant I could stamp one of the lovely borders from 'Lovely Stitching', this month's stamp set, on to the half inch extra space on the back. I used Peekaboo Peach ink to do that.

The cardstock I used for this was Peekaboo Peach from the 'Fruit Stand' cardstock pack and the mat of DSP is one of the sheets from the same suite. I just love those strawberries!
It's one of my favourite suites and I'm using it lots.

I cut the cardstock to 6" x 8-1/2" but still scored (on the long side) at 4" as if I was making a regular card, which then gave me that half inch extra on the back to stamp on.
I'm so pleased that the stamped stitching ended up straight!

I then cut the DSP slightly smaller at 5-3/4" x 3-3/4" and centred it on the front of the card.

I used the sentiments and one of the smaller flower stamps from the 'Lovely Stitching' stamp set to add the finishing touches to the front of the card. I used Bermuda Bay ink.
These are stamped on to a small piece of Whisper White cardstock measuring 2" x 2". 
I rounded the corners and used Dimensionals to raise it up a bit rather than have the whole card flat.
I sponged round the edges using the same Bermuda Bay ink to soften and contrast the white against the colour of the DSP.

It was an easy card to make which really didn't take long at all.


I hope you like it!
Do let me know what you think and I'd love to see any that you guys might make too. So remember to leave a comment as you drop by and I hope to see you again next week.

Have a lovely week!
Karen


Product List

Sunday, 7 August 2016

Simple Sundays - custom made bookmark

This week my hubby started reading one of his new books which was a recent gift from our girls.
It's a black and red book, so he asked for a bookmark to match!
No pressure ........ !!

However I do love a challenge and it didn't take long to get my plan underway ......


The biggest challenge was getting the red to show through the punched design at the top, but I hatched a cunning plan to use just a small piece of paper rather than card so that it didn't end up all uneven, lumpy and top-heavy.
So it's not an optical illusion using the red background that's in the photo!

The measurements are:

Black cardstock 5" x 1-1/2"
Black DSP 4-3/4" x 1-1/4"

The black base has all four corners rounded, but because the DSP has a punched design at the top, only the bottom corners are rounded.

I've not added a product list for this as it's not all Stampin' Up! products and the punch I used at the top of the DSP is sadly now retired (but was Stampn' Up!).

However the DSP is the reverse side of one of the sheets in SU's 'Pop of Pink' DSP pack.

This is more just to share a simple project and hopefully inspire someone to make a bookmark for themselves or as a gift. Any materials can be used to make a simple project like this - I just prefer to stick with SU products most of the time ........ until hubby asks for something specific which has me raiding ALL my craft stash!

Check back soon for some more bookmark ideas with pictorial tutorials, including magnetic versions too!


See you again soon!

Thursday, 4 August 2016

Pootlers Design Team - August - Week 1

Hello and welcome to my fabulous opportunity - and privilege - to be part of the Pootles Design Team for August!
Each month, 4 or 5 of us 'Pootlers' who are in the gorgeous Sam Hammond's Stampin' Up! team are challenged to come up with a design each week from one stamp set.
You can see other projects for this month and previous months (and, of course, visit again in future months!) at www.pootles.co.uk

Our stamp set for August is 'Lovely Stitching'.

My project for Week 1 is a set of 3x3 note cards in the new 2016-2018 In-Colours: Peekaboo Peach; Emerald Envy; Flirty Flamingo; Dapper Denim and Sweet Sugarplum.
I've also made envelopes to match in the same colours using the 2016-2018 In-Colour Envelope Paper.


I've done a pictorial step-by-step tutorial on how to make these, so I hope you enjoy and will have a go at making them. I really enjoyed making them and I'm really pleased with the end result - I'm delighted that the idea managed to get from my head to my craft table!

So without further ado, let's get on with the pictures!


First, cut 5 pieces of thick white cardstock measuring 3" x 6"


Then score each piece of card at 3"


Fold and burnish along the score line on each to make a card measuring 3" x 3"


You now have 5 card bases 


Then cut one piece of cardstock in each of the 5 in-colours measuring 2-3/4" square


Then cut 5 pieces of white cardstock measuring 2-1/2" square and stipple with each of the 5 in-colour inks using a sponge (I use the Stampin' Up! sponges cut into quarters


 Stick each stippled piece on to your co-ordinating cardstock squares 


 Then get ready with your chosen stamp set - for this project it's the 'Lovely Stitching' set .....


 ..... and stamp your chosen design(s) in each of the 5 in-colours on scrap pieces of white cardstock


 I then cut mine out using the 1-3/4" circle punch


 and sponged round the edges using the relevant colour


I then added a large basic pearl to the centre of each flower to add a bit of bling!


 Add dimensionals to the back of each punched flower


and stick to the centre of your card front
Peekaboo Peach


 Dapper Denim


 Flirty Flamingo


 Emerald Envy


 Sweet Sugarplum


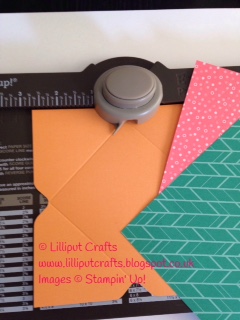
Make matching envelopes in the co-ordinating 2016-2018 In-Colours Envelope Paper using the Envelope Punch Board


Decorate as you wish (or not) with the co-ordinating ink - these are stamped in the same colour as the envelope (Emerald Envy ink on Emerald Envy paper and so on)


 Little Miss Flirty Flamingo card peeking out of her envelope ....


 ..... and hiding inside her envelope to let you see the double-sided tape for sealing the envelope ready to post


 And finally, all 5 cards complete!


Thanks to Stampin' Up!'s 'Fruit Stand' DSP for providing the backdrop for the photos!


I hope you've enjoyed this project and I hope you'll have fun making your own. I'd love to see your creations, so please feel free to post pictures in the comments below.

Hope to see you again next Thursday for week 2!

'Bye for now!
Karen

Product List